Thursday, May 8, 2014

DIY Leather Scarf Cuff


I first discovered this fabulous yet simple scarf accessory on Etsy by a seller named, ThreeBirdNest. She makes and sells beautiful scarfs and accessories. I found myself completely and positively inthralled with a teal scarf that had a leather cuff around. I loved how a piece of leather can make a scarf that's already bold, BOLDER. It's like, literally, an accessory for and accessory and I loved that. The only downfall was my pesky conscious that prevents me from buying anything that I feel is over-priced. I said to myself, "self, you can make that." AND SO I DID, and this is how…


What you'll need:

- 2 strips of Leather trim. I found mine at Michael's for about $3.99 a trim.
- a button 
- a pair of sharp fabric scissors
- an xacto knife (unphotographed)
- a needle
- thread 
- a thimble (unphotographed) 
MAKE IT:


1) First thing you'll want to do is measure a 3-4 inch long strip of leather that's as wide as your button is. Cut that small strip out of one of the leather trims, making a small snip of the corners to make them rounded (thats optional i suppose, but i like the fact that the edges of the are consistant.)

2) On the other larger strip of leather, sew the button in the middle of one end of the strip.


3) Using the xacto knife cut a slit, as the button hole, on the small baby strip of leather. Cut it as long as you need until the button fits into the slit. 


4) Sew the baby piece on the large strip (sew it on the opposite side to the button) I sewed mine so that the two leathers were attached by an "X stitch", just because I knew it could be visible so I want it to look nice. 

5) THEEEENNNNNN….Attach this to any scarf you'd like! I put mine on chunky infinity, knits, etcetera, etcetera, ETCETERA! 


How to Pray for a Friend.


While I lay here in bed at approximately 4:17 am, I am mentally walking on a plain of what to write. I know what I want to say, but how do I translate it so that others may understand...

Let me start, in short, by saying that a really great friend of mine texted me and asked for a prayer. I prayed of course, but still felt as if there was a slight gap in my prayer.  The Lord knows what I mean to say, what's on my mind but I wanted to discover it for my own.

I went on Pinterest and searched the words "how to pray for friends" and this brought up several things. How to pray for your husband. How to pray for your children and specifically, how to-literally- pray for friends, i.e pray that The Lord bring friends to you. While that wasn't exactly what I was looking for, I re-typed the words to say "how to pray for a friend." This brought up very similar pins that the other search did, along with some picures of inspirational people, friendship quotes and even some humorous photos of animals with their paws together in Prayer. Still, not what I was searching for.

I thought, "Wow. Out of all the things there are on Pinterest,..." There aren't many posts about how to pray for a friend. So in my feeble attempt, I would simply like to share a prayer with you that can be used in all occasions as far as friendships go.

"Heavenly Father, 
I pray to you at this moment, Lord, for my friend.
Thank you,
for this friend whom 
you have crossed my path with. 
You have brought them fourth 
for reasons 
that will change me forever. 
I pray, 
that we be influenced by each other 
in the way you intended us to be.
I pray,
that every decision we make in our friendship 
be in line with your grace.
I pray,
that we act as your puppets
And understand that 
you are the puppeteer.
I pray,
that when their ship of faith
goes astray,
you grab that wheel
And steer them back to shore. 
I may not know
all of their struggles, 
but you do, Lord. 
And in those struggles,
I pray,
 that they find 
comfort, 
joy, 
peace, 
love, 
guidance, 
&
reassurance 
that they will be carried by you and your will, Lord.
Father, I pray for my Friend.

Amen." 


Tuesday, March 25, 2014

Diet Bet


        Let me tell you, … Just let me tell you about DietBet. This is probably the best motivation I've found for weight loss! Diet bet is basically exactly was a it sounds like; its a diet that you bet on. Basically, you create an account and depending on which diet bet you chose to do, you will have to pay about $25-$35(?) to enter. Lets say you enter a One-month challenge, you have that one month to lose 4% of your starting weight. At the end of the game, if you've lost the 4% but the end of the game, not only do you win YOUR money back, but you also win some of the money from the people who also entered but dint win. 

        HERE IS THE CATCH: You can't cheat. You take pictures in the beginning and the end of the challenge, of yourself in "airport attire" and they also give you a keyword to place by the scale while you stand on it. Snap those pictures and submit it to be reviewed by official referees.  I did the 4% challenge a while back ago when ShayCarl (Youtuber; Shayloss) did one and I lost because my Aunt Flow decided to visit me during my last weigh in; Needless to say I was so excited for her visit. 

        This time, I'm doing the 6-Month, 10% challenge. Same rules apply but you are to lose 10% in 6-Months with a $25 monthly bet. So, if I don't win this one, I'm a schmuck and lose a lot of money; And if money isn't motivation enough to keep up with physical exercise and my running goals, I don't know what is… *cough, cough* Ryan Gosling…

Wednesday, February 12, 2014

Pre/Post Workout Egg and Avocado Open-Faced Sandwich

I can not even speak about how much i love this Open-faced "Sandwich" as a pre-- or post- workout meal. It has so much protein because of the egg and at the avocado and its is jam packed with flavor. I just love it aaaaand there is a high chance that you have all, if not most, of the ingredients needed.  You should just go eat this now. 
I was teaching a friend to make this so we used what she had, but I put in parenthesis which of the product I actually like to use. It turns our delicious either way, though. Since it's a very known fact that you don't need special, organic, expensive or brand name product to eat and be healthy. 

What you'll need:
  • EGG
  • Avocado
  • Whole Wheat Bread (read my post about…)
  • Yellow or Dijon Mustard
  • BalsamicVinegar
  • Extra Virgin Olive Oil
  • Salt (preferably Fresh ground Sea salt, or Pink Himalayan salt… i love that pink yum yum. I'm not even a salt person)
  • Pepper (fresh ground!)

1) Toast your bread!


2) Spread your mustard, just a little… don't get crazy.


3) Cut up your avocado and put the slices over your bread.


4) Drizzle a couple of drops of both EVOO and Balsamic Vinegar. 


5) Cook up your egg, don't forget to season with salt and put the egg over the avocado. I made mine over easy but I've also done with recipe with poached, medium-hard poach, hard boiled and I suppose if neither of those sound good, you could do scrambled… and if you don't like eggs, leave. 


6) Add the pepper over the egg and if you need, more salt and thats it! Delicious, nutritious, what else do you need? 

Thursday, October 3, 2013

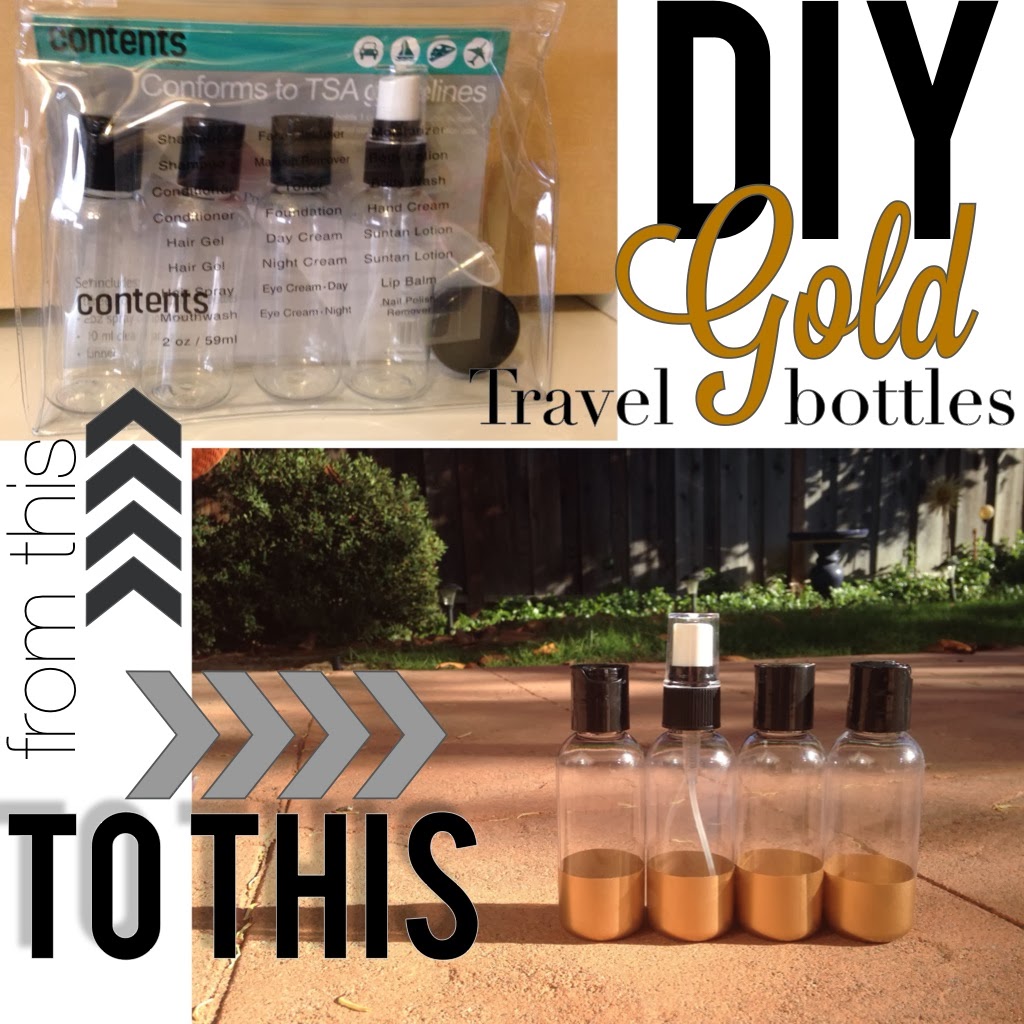
DIY Gold Travel Bottles

THE COUNTDOWN! With less than one week left until I fly off on my first trip to Hawaii, it's needless to say that I am getting RIDICULOUSLY ANTSY! So, it is craft time! I bought my travel sized bottles from Target but all they had was lime green or turquoise bottles. They were cute, but not me. I searched up and down the isle and finally found a single pack of clear bottles with black caps. I have no idea where they kept the stock but I put them in the cart and thought, "I could work with this." Once home, I decided I'd spray the butts...because it would be adorable. AND IT IS!

On that note: This will also be a rant about how much I LOVE LOVE LOVE FROG TAPE! It goes on so easily, it peels off just as easily AND WITH CLEAN LINES. Go ahead and use the brand of your choice but I swear by a roll of Frog Tape.


And on THAT note: I also bought a Spray Nozzle for even spraying and it is probably one of the best thing an avid sprayer could invest in! You're not even really investing because the thing only costs like less than 5 bucks (at least mine did). It snaps on and off to any spray nozzle and you get amazing beautiful coats! Basically, you need to just go buy one... right now. Go, like now.


What you'll need:

  • Bottles 
  • Frog Tape 
  • A piece of paper
  • Scissors
  • Spray Color of YOUR choice. I just used the always beautiful GOLD! (Krylon Color Master in Metallic Gold.)
  • **A Sharpie is in the picture but I didn't end up using it. I was going to use it to mark where i wanted the tape to be... not necessary.
  1. Fold your paper length wise (AKA HOTDOG STYLE) and cut along the line. I ended up cutting those halves in half again, but this time width wise (AKA HAMBURGER STYLE)
  2. Lay half of your tape on top of the pieces of paper, like so.
  3. Line the frog tape up to the part you want to spray. In case you were wondering, the reason I did this was to protect the rest of the bottle from getting sprayed. You could just tape the whole thing up, but frog tape is kind of pricey to waste that on. 
  4. Lay them out, put something in between each bottle to space them out. I used wood chips because thats what was right next to me. Find something to your use.

  5. Spray back and forth onto each bottle and let dry completely before turning and doing a second coat. (The spray I used said, "dries in 15 minutes or less" but I waited about half hour before turn"
  6. Once you've got your coats all done, let dry COMPLETELY THIS TIME (2-3 HOURS) then peel off the frog tape and reveal your clean sprayed lines; I MEAN LOOK AT THOSE! ALMOST AS CUTE AS A NEW BABY...almost. These beautifully chic travel bottles... I don't even know what to say. They speak for themselves. Travel in style as much as possible, Ladies and Gents. 

Monday, September 30, 2013

Keep that Glitter IN CHECK!


As much as I love shining bright like a diamond, I want the things I glitter to stay on the things I glitter. Here is a tutorial on how to lock in the glitter and well,... keep it in check.

Items you will need:

  • A workspace that is safe to spray on 
  • The object you will be spraying
  • Frog Tape or any kind of easy-peel paint tape
  • Clear spray (I used, Krylon UV-Resistant Clear Acrylic Coating in Glossy)

  1. Frog Tape up the area that you dont need sprayed.
  2. Spray the item with the clear spray. (I did two coats with 1 hour of drying in between coats)

  3. Let item dry completley then gently peel off tape!
  4. There you have it. No more glitter all over the place. NICE AND SEALED... and in check. Just the way your man should be.<3

Wednesday, July 24, 2013

Mason Jar Coin Bank


I've recently made my first big purchase! A NEW CAR!!!! Her name is
Chanel (after the one, the only, Coco!) She is fabulous and I love her. However, I did NOT love the fact that she didn't have any coin compartment. I had change scattered all around that pretty white vehicle! I looked at auto stores and Target but they only had those ones that went in the cup holder and held all coins but pennies (uhhh, hello, PENNIES ARE MONEY, TOO!!!) I then began thinking of ways I could make one. It had to be something small but sturdy. At first I thought that I would use the tin from that ol' band aid bubble gum. Yeah, well it turns out, I CAN'T FIND THAT STUFF ANYWHERE!! The realization of my young yet old age, ugh! Then I thought of a mini mason jar! I figured if I found a small enough one I could put it in my arm rest compartment; PERF! I also knew I didn't have the tools to cleanly create a coin slot so I set out to Michaels and got all I needed for my solution to that. And heeerrrreee we GO! 


Items you will need: 
• Mason jar, you can use any size you want; I believe mine was a 4 oz.
• Choice of a thick cardstock type paper, aka scrapbook paper; I couldn't find one that I loved (ridiculous considering the amount of choices) so I got a light minty teal and an accent rice paper to overlay. 
• Scissors. 
• A precision knife, xactor knife, or razor. 
• Pencil or a pen. 
• ***Adhesive spray(unphotographed) ; if you used 2 different papers like me.


Step 1:
Using the canning lid of your jar, trace the circle size on the paper(s). I do this on the backside of the paper so when I cut the circles the outline won't show. 


Step 2:
Cut out both circles!


 Step 3:
In the center of the paper, I hand drew a coin slot (fancy lingo for draw a baby rectangle). I held a quarter over it to see that I would fit. 


Step 4:
Cut out that rectangle using your sharp utencil.


***Step 4a:
If you used two types of papers, trace the same rectangle using the first as a stencil and cut that little guy out.


Step 6:
Place paper right side up into the twisty lid portion and secure it onto your jar 
***I ended up using spray adhesive to adhere the rice paper and scrapbook paper together  just because when you screw the paper on the lid the coin slots would  move in different directions and it got annoying to make sure they slots were aligned. 


AND VOILA! 
You can place this in your cupholder or in 
your arm rest compartment or this would be cute on a dresser, desk or bookshelf! Use it how you may!