Monday, October 19, 2015

No-Machine Pumpkin Spice Ice Cream Pie


Oh my Pumpkin Spice season!
Living in California can kind of put a damper on the ideal "sweater weather." While the leaves eventually change to their picture perfect colors, it doesn't really feel like fall. It can be rainy one day and 85 °F the next, BUT that doesn't stop us from adding the flavor of fall to everything we eat! Two words... PUMPKIN SPICE. Prepare yourself for a few spectacular words... No-Machine Pumpkin Spice Ice Cream PIE! Yes, oh yes, you read that correctly. Pumpkin Spice flavored Ice Cream, made with NO ice cream machine, in a pie. Okay, okay, there is a catch. This isn't really "ice cream" per-se; it's whipped cream with canned pumpkin and sweetened condensed milk that's been mixed and frozen.
I found the no-machine pumpkin spice ice cream on Pinterest  on Eazy Peazy Mealz but I've made a few alterations to the recipe.  (Click HERE to be directed to the original ice cream recipe).
Keep in mind this is a quick-ish version way to make this and I'll explain the more "Homemade from Scratch" as the instructions go on.

Ingredients:

Ice cream (makes about 4-6 quarts, there will be left overs after pie crust is filled)
  • 3 cups of heavy cream
  • 1 can (14 ounces) sweetened condensed milk
  • 10 ounces canned pumpkin, not canned pumpkin 
  • 2 Tbsp pumpkin pie spice.
  • 1 Tbsp vanilla extract 
  • 1 cup sifted powdered sugar (aka, icing sugar)
Crust
  • one 9-inch pie crust
Caramelized Walnuts
  • 1 cup walnut halves
  • 1/4 cup granulated sugar
  • 2 tsp butter
Chantilly Cream
  •  1 cup of heavy cream
  • 1/4 cup sifted powdered sugar
  • 1 tsp vanilla extract

How to:

*Pre-note: The first time I made this, I didn't have to much time to make the crust from scratch, so I made the caramelized walnuts, chopped some and put them on the bottom of the store-bought crust. The 2nd time I made it,  I added the finely chopped walnuts into the graham cracker mix, before pressing into the pie pan.

  1.  In a small nonstick pot or pan add walnut halves, sugar and butter.
    Leave on medium heat, stirring constantly until sugar has turned light amber brown.
    Transfer to parchment paper or silicone mat.
  2. In a medium bowl, mix together canned pumpkin, condensed milk, sifted sugar, pumpkin pie spice and vanilla. Set aside.
  3. In a Large bowl, whip 3 cups of heavy cream until stiff peaks form.

  4. Mix the pumpkin mixture by halves into the whipped cream, mixing until just combined.
  5. Chop walnut halves, set 2-3 tablespoons aside and put remainder on the bottom of the pie crust. 
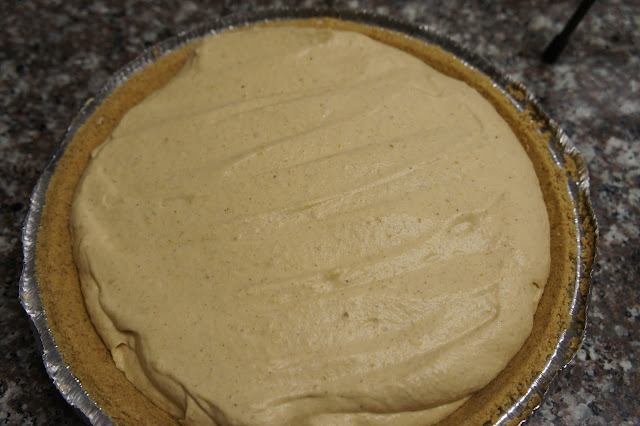
  6. Pour whipped pumpkin mixture into pie crust. Freeze for at least 4 hours or over night.


  7. Presentation: Whip Cream, powdered sugar and vanilla to make cahntilly cream until stiff peaks. Transfer to piping bag with a tip and pipe shell border. Sprinkle remainder caramelized walnuts on the whipped cream.

Thursday, January 8, 2015

DIY Cake Pop Stand

        Soooooo, This week I had an event where I was requested to make cake pop's. I had only made them once before and from what I can remember it was a disaster. I also remember having trouble finding where to put them when I finished dipping them (I used glass cups to stand them in while they solidified.) I decided I wanted to make a cake pop stand for myself to use, and though I don't make them often I would have the stand available to my use, if needed. I also did some research on cake pop stands that most people use and they used a styrofoam slab, but styrofoam is pretty dang expensive; I want mine to be more durable!

Before we began, let me tell you about my hunt for wood at Home Depot and Lowe's. To find your perfect size wood, you basically just have to walk around the store and browse different thicknesses and lengths of wood. The best thing I could find was a long piece of wood that is used for stairs. The piece is about an inch in thickness which is good support for the pops' sticks and it was long but we just asked them to cut it in half for us. It does have a rounded edge on one side but that didn't bother me. If it bothers you, there is no harm in just chopping it off. As far a color, it was unfinished Knotty Pine, so I went ahead and bought grey wood stain. I also knew I wanted to add some handles to make this Cake pop Holder have that IT factor. Lets get started,…

What you'll need:
  • 1-Slab of wood of choice, (at least a 1 inch thickness)
  • A Pencil
  • A Ruler
  • An Electric drill with the drill head that fits the size of your sticks, nice and snug.
  • Sand Paper
  • Wood stain *optional
  • Stain Brush *optional
  • Old towel/ Paper towels *optional
  • Handles (from the cabinet section of the store!)
Instructions: 

Step One: 
        With your ruler and pencil, draw out a grid that measures out how far each hole will be. I did an Inch and a half apart per stick. 

Step Two:
        Drill where each corner of the square on your grid is but making sure you don't drill all the way through your board; if you do drill all the way though when you pick up the cake pop stand the sticks will fall all the way though. 

Step Three: 
        Sand down the board to be smooth if needed. You're technically done after this step but if you'd like to add a little something more to your stand, please continue to read! 

Step Four: 
        Using your stain, give as many coats as you need to achieve desired colors. What I did for my board is i would do one coat, then rub off access with a paper towel and let that dry completely. i wasn't sure if i wanted a second coat because i really liked the grain of wood that was visible after one coat so i placed (not attached) the handles to see how I felt about it. I decided to give it a second coat after all and see how i felt about it. Aaaaand, I LOVED IT!!!! J'ADORE!!!! 
Let dry completely and a coat of finishing wax and screw on some handles if you'd like then you are DONE!!! Below are pictures in between coats and photos of the first time I put cakepops on the stand (you can tell i didn't have time to screw on the handles)! Lovely! 

Baby Fever


         Alas! Feast your eyes on this delicate beauty! Months ago I took photos for one of my Best Friends' newborn, AKA my beautiful God Daughter. She was one month and I had been itching to do some newborn photos since my friend had told me she was pregnant. I had wanted to her to have a boy since she already has a daughter. The anticipation of finding out the sex of the baby is such along wait, so to keep myself occupied, I went on the Pinterest hunt for baby boy poses and props. There were so many cute poses for baby boys that link them to daddy. AND THEN... we found out the baby was a girl! AHHHH! I was in shock. I really thought she was goint to have a boy but at the same time I was incredibly excited for her to have a girl because I have 3 nephews. Buying girl stuff would be such a refreshing change. Tutus, Bows and sparkly EVERYTHING! How can it get better. But of course, I was going to be happy with whatever God would bless her family with.


        As Preparation for the photo shoot, I bought (& brought) quite a list of things. I'd read to make sure to have something to use as light reflectors (I had car windshield heat reflectors; the silver side would have worked if I had ended up using them but the lighting was perfect naturally!) I also read in colder weather to have a heater going to keep the room cold to prevent a fussy baby. I also got a cream-colored knit blanket and a furry bath rug from target. I even went as far as painting my own back drop. I asked a guy at the farmer market if i could have a crate, which I sanded down smooth and slightly stained. I got a chalk board plaque from michaels($2.99) and wrote "Alexia is One Month."  Aaaaand, just like that the itch for the baby photoshoot was gone & I think the photos came out just too dang adorable!!